Let’s get started understanding how themes work with a simple example.
Creating A Theme
Themes, unlike master page files, need to live underneath a special directory by the name of App_Themes. Visual Studio will add an App_Themes folder to a web application when you right click the web project, select Add Folder from the context menu, and select the Theme folder item.Also unlike master pages (which are single files), themes consist of a collection of files. A theme may contain .skin files, style sheets, and even image files. To organize and name themes, we use subfolders in App_Themes. In the following screen shot, we have a theme by the name of “Odeish” and a theme by the name of “Codeish”.

Inside of our Odeish folder we will create a .skin file. You can add as many .skin files to a theme as you need. Each skin file will contain one or more control skins. A control skin specifies the property settings to apply to a specific type of control.
In our example, we will create a skin file with the name of Calendar.skin. Although our skin file will only contain the control skin for a single type of control – the Calendar control, we could take a different approach and add all the control skins for a theme inside of a single skin file. In this case our Calendar.skin file will contain the following.
<asp:Calendar runat="server" BackColor="White"
BorderColor="#3366CC" BorderWidth="1px" CellPadding="1"
DayNameFormat="Shortest" Font-Names="Verdana" Font-Size="8pt"
ForeColor="#003399" Height="200px" Width="220px">
<SelectedDayStyle BackColor="#009999" Font-Bold="True"
ForeColor="#CCFF99" />
<SelectorStyle BackColor="#99CCCC" ForeColor="#336666" />
<WeekendDayStyle BackColor="#CCCCFF" />
<OtherMonthDayStyle ForeColor="#999999" />
<TodayDayStyle BackColor="#99CCCC" ForeColor="White" />
<NextPrevStyle Font-Size="8pt" ForeColor="#CCCCFF" />
<DayHeaderStyle BackColor="#99CCCC" ForeColor="#336666" Height="1px" />
<TitleStyle BackColor="#003399" BorderColor="#3366CC" BorderWidth="1px"
Font-Bold="True"
Font-Size="10pt" ForeColor="#CCCCFF" Height="25px" />
</asp:Calendar>
Here is another example showing the control skin for a server side Label control. We can place this skin inside a second skin file in the Odeish theme by the name of Label.skin. This skin will set all of our Label controls with a BlueViolet ForeColor property.
<asp:Label runat="server" ForeColor="BlueViolet" />
Applying A Theme
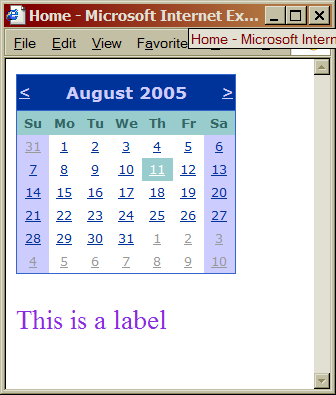
There are several ways to apply a theme to your pages. In the following web form we’ve set the theme using the Theme attribute of the @ Page directive.<%@ Page Language="C#" AutoEventWireup="true"
CodeFile="Default.aspx.cs" Inherits="_Default"
Theme="Odeish" %>
<!DOCTYPE html PUBLIC "-//W3C//DTD XHTML 1.1//EN"
"http://www.w3.org/TR/xhtml11/DTD/xhtml11.dtd">
<html xmlns="http://www.w3.org/1999/xhtml">
<head runat="server">
<title>Home</title>
</head>
<body>
<form id="form1" runat="server">
<div>
<asp:Calendar ID="Calendar1" runat="server" />
<br />
<asp:Label ID="Label1" runat="Server" Text="This is a label" />
</div>
</form>
</body>
</html>
Note: there is no support in the designer for creating skins (only the text editor), nor for viewing a themed page. The only way to see the end result is to view the page in a browser after a successful build.
It’s also important to point out that the property value specified by a theme will override any property value in the ASPX markup. For instance, even if we marked our Label control with ForeColor=”Black” in the ASPX markup, the Label would render with a BlueViolet color, because that is the color specified by the theme.
You can also set themes at the application level using web.config (or at the machine level using machine.config). Use the theme property of the <pages> section as shown below. You can override the configuration setting with the Theme attribute in the @ Page directive.
<?xml version="1.0"?>
<configuration xmlns="http://schemas.microsoft.com/.NetConfiguration/v2.0">
<system.web>
<pages theme="Odeish" />
<compilation debug="true"/>
<authentication mode="Windows"/>
</system.web>
</configuration>
We can programmatically set the theme for a page. Like the MasterPageFile setting we discussed in the master page article, the Theme property must be set in the PreInit event of a page. This is because the skins in a theme are applied after the PreInit event fires but before the Init event fires. Later in the article we will take a closer look at how the runtime applies skins.
public partial class _Default : System.Web.UI.Page
{
protected void Page_PreInit(object sender, EventArgs e)
{
Theme = "Odeish";
}
}
Now that we’ve seen the basics of how to create and apply themes, we can dig into more details.
Named Skins
You can only specify one default control-skin in a theme per control type. In our example, it would not make sense to define a second skin for the Label control in the Odeish theme since we already have a skin defined for Label, and ASP.NET would not know which to use. However, you can specify alternative named skins for a control with the SkinID property.In the skin file that follows, we’ve defined the default skin for a label to use a BlueViolet color, while the skin named BlackLabel will use a black forecolor.
<asp:Label runat="server" ForeColor="BlueViolet" />
<asp:Label runat="server" ForeColor="Black" SkinID="BlackLabel" />
<body>
<form id="form1" runat="server">
<div>
<asp:Label runat="server" ID="label1"
Text="Hello World" />
<br />
<asp:Label runat="server" ID="label2"
Text="Hello World" SkinID="BlackLabel" />
</div>
</form>
</body>
Overriding Themes
Earlier, we mentioned how a skin will overwrite any display properties we set on a control in our ASPX page. There might be times when this is not the desired behavior. One way to avoid the application of skin properties is to disable themeing for a specific control (or for an entire page) by setting the enable themeing property to false.<asp:Label runat="server" ID="label1"
Text="Hello, from OdeToCode"
ForeColor="Green" EnableTheming="false" />
A second way to use individual control properties is by specifying a StyleSheetTheme instead of a Theme. Unlike the properties applied by a Theme, the properties applied by a StyleSheetTheme can be overridden in a page. In the following webform, the first Label will display with the BlueViolet color of the Odeish theme, while the second label will override the skin setting and display with a DarkSalmon color.
<%@ Page Language="C#" AutoEventWireup="true"
CodeFile="Default4.aspx.cs" Inherits="Default4"
StylesheetTheme="Odeish" %>
<!DOCTYPE html PUBLIC "-//W3C//DTD XHTML 1.1//EN"
"http://www.w3.org/TR/xhtml11/DTD/xhtml11.dtd">
<html xmlns="http://www.w3.org/1999/xhtml" >
<head runat="server">
<title>Untitled Page</title>
</head>
<body>
<form id="form1" runat="server">
<div>
<asp:Label runat="server" ID="label1" Text="Hello World" />
<asp:Label runat="server" ID="label2" Text="Hello World"
ForeColor="DarkSalmon"/>
</div>
</form>
</body>
</html>
Interesting note: the Visual Studio designer will display the form with the skins applied when a StyleSheetTheme is in effect. The designer does not apply skins when a Theme is in effect.
Themes and CSS Style Sheets
Themes and CSS files can work together to control the look of your application. You can add one or more .css files into a theme directory. ASP.NET will automatically apply all of a theme’s style sheets into a page by injecting a <link> element for each .css into the header of a page. Your page must have runat=”server” in the <head%gt; tag for the automatic style sheet inclusion. The pages created by the IDE have this setting automatically.For instance, we can control the background color of our page using the following style sheet.
body
Obviously, style sheets and skins have some overlap. For instance we could use a skin to set the ForeColor of our label, or we could have used a CSS class to set the color of our label text (perhaps by setting the CssClass property of the label with a skin). {
background-color:Gray;
}
Here are some points to consider when deciding on a skin file versus a style sheet entry.
- Web designers will be more comfortable with css files. If you put the design of your site into the hands of professionals than you should be asking them to use css wherever possible. This will allow you to just drop new and updated css files into the theme folders and be ready to go.
- Developers might be more comfortable with skins. Since skins look just like a control declaration, a developer will have an easy time creating a skin file. There is also no need to know in advance what HTML a complex server-side web control will produce in order to write the correct class and styles.
- Skins are applied server-side and can set more than just style related properties. For example, in our Calendar.skin example we were able to set a default for the DayNameFormat for all calendar controls using the theme.
- Likewise, you can control some areas with CSS (like the body element above) with style sheets and not skins
- While the settings in a style sheet cascade, the properties in a skin are absolute, i.e. you can override a style sheet with a local setting but not a skin (unless you take one of the steps outlined in this article).
- Different browsers may react to style sheets in different ways. You can count on skin files to always apply their properties to controls consistently on the server (it’s up to ASP.NET to translate those settings into the correct settings for the client).
Themes with Images
You can also include images in the themes directories. Images inside of themes are particularly useful for controls like the TreeView, and Menu controls that rely on consistent but customizable images to render themselves.All you need to do is provide your skin with a relative URL to the image. ASP.NET will take care of fixing up the URLs.
Under The Hood
When a request arrives for an ASP.NET 2.0 site, the runtime will parse and compile the App_Themes directory into assemblies. Although we might not think of a theme as being “code” (nor may a theme or skin file actually contain any code) – the runtime does turn each theme definition into code inside an assembly.Each assembly will contain a class representing the theme – this class will derive from System.Web.UI.PageTheme. The class will contain a LinkedStyleSheets property that returns an array of string – the filenames for the styles of the theme.
The class will also maintain a dictionary data structure. The key into the dictionary is a type (like typeof(Label) and typeof(Calendar). Given the key, the dictionary will return a ControlSkinDelegate. The delegate is a pointer to the method that “builds” a control according to the rules in a skin file. For example, the skin file for our label produced the following method.
private Control __BuildControl__control11(Control ctrl)
{
Label label1 = (Label) ctrl;
label1.ForeColor = Color.BlueViolet;
return label1;
}
Themes and Master Pages
As we alluded to earlier in the article, there can be some overlap between themes and master pages. In the previous article we actually controlled the layout of our application by defining <div>s in our master page and specifying the layout of the <div>s in a .css file.The above approach is a viable approach when using themes. Push your layout defining css into the themes folder for the ultimate power and flexibility. Your master pages will continue to define the basic structural elements and common content for every page.
No comments:
Post a Comment